

Ninja Foodi Cooking Times Chart
First of all, Congratulations! You have made a terrific choice in purchasing a Ninja Foodi Pressure Cooker & Air Crisper! If you are still on the fence, this article is for you, too!
In this article we are going to go over the various models, discuss getting started with your Ninja Foodi, do a brief overview of the cooking functions and provide a few tips. So, let's get started on how to use the Ninja Foodi!
If you are new to pressure cooking, I recommend reading this article before you get started: Pressure Cooking 101
What are the differences in the models of the Ninja Foodi?
There are multiple sizes and models of NInja Foodi Pressure Cooker & Air Crisper and new ones are being added all the time. It can get very confusing and while I will go over the basics in this article, if you are thinking about buying one please refer to this article which goes into detail the differences and is a great resource and buying guide!
Ninja Foodi Pressure Cooker & Air Crisper Sizes
The Ninja Foodi Pressure Cooker & Air Crisper comes in 3 different sizes; a 5 quart/4.7 liter, a 6.5 quart/ 6 liter, and an 8 quart/ 7.5 liter.
The size you choose is based on the type of cooking you want to do as well as the space you have in your kitchen or where you want to keep your Ninja Foodi. One important thing to keep in mind is the circumference of all three sizes is the same, only the height is different.
The 5qt Ninja Foodi is a good choice when you want a smaller appliance and only plan on making one-pot meals, soups, small roasts and chickens. The 5 quart is not the best choice if you want to do layered meals or 360 meals because there isn't enough room for 3 layers. You can do 2 layers of cooking with the right accessories.
The 6.5 qt Ninja Foodi is very versatile and is the size I use in most of my recipes. You can make almost anything in it and there are plenty of accessories that will fit.
The 8 qt Ninja Foodi is the tallest of the three and is great if you like to make large pots of soups, more than 6 services of one-pot meals, and cook larger cuts of meats. The only downside to the 8qt from my standpoint is it sits a little high for me to comfortably work with because I'm on the short side (5'2").
Ninja Foodi Pressure Cooker & Air Crisper Functions
This is perhaps the area that is most confusing because different models have different functions. The newer the model, the more functions it will have, but with the extra functions also comes a higher price tag.
So, deciding which functions you will use the most can help narrow down the models.
Standard Functions
The following functions are standard on ALL Ninja Foodi Pressure Cooker & Air Crisper appliances no matter the size.
- Pressure Cook
- Steam
- Slow Cook
- Sear/Sauté
- Bake/Roast
- Air Crisp
- Keep Warm (I'm pretty sure this is standard)
Additional Functions and Their Uses
- Sous Vide: this is used to cook food at set temperatures in a water bath. The food is in containers and cooked by the surrounding water. It works very well despite not circulating the water like other immersion sous vide cookers do. Here is a recipe that I did with chicken breast and there is a full video to see how it works: Sous Vide Chicken Breast
- Yogurt: This function makes yogurt from milk and a yogurt starter. You can also make yogurt using the dehydration function if you have that and not the yogurt function: Homemade Yogurt in the Ninja Foodi
- Dehydration Function: This function uses the crisping lid and lower temperatures to dehydrate food, proof bread, and can be used for yogurt making. While the dehydration function works well, because of the design of the Foodi, it isn't as good for dehydrating large trays of food like a stand alone dehydrator would be.
- Broil/Grill: This function is standard on most models, but one of the 5qt models doesn't have it, so it's in this section. Broil is the US term and Grill is the term on European models.
- Proof: On the newest models (OL501, OL601, OL701) there is a new function called proof. This is used mainly for proofing bread, but can be used for other low temperature applications. The temperature range is 75-95 ℉. These models are not available in all countries yet.
- Steam & Crisp: Another new function on the OL501, OL601 & OL701, the steam & crisp allows you to start with steaming and finish with crisping. This is great for whole chickens and making bread. If you don't have this feature and want to make a whole chicken, try this recipe! Ninja Foodi Whole Chicken
- Steam & Bake: This is similar to Steam & Crisp, but uses the bake function after steaming to fully cook the food. This function works great for homemade bread! This function is also only available on the OL series.
If you are interested in the OL series with the additional functions, make sure to check out my complete buying guide because you don't want to miss out on the programmable pressure release!
What is a Ninja Foodi and What does it do?
If you aren't sure exactly what a Ninja Foodi is or are unsure about all of its features, here is a brief description of what it does.
A Ninja Foodi with TenderCrisp technology is an electric kitchen appliance that functions as a multi-use cooker. Its two main features are pressure cooker and air fryer, but it also does so much more. Here are the features:
The following features are used with the pressure cooking lid on.
Pressure Cooker:The pressure cooking function can be set to Hi or Low and you can customize the time that you want the food to cook up to 4 hours. When using the pressure cooking function, you will turn the black valve on the top of the Foodi to seal. I have a great article that goes over the principles of pressure cooking and I encourage you to read it before getting started: Pressure Cooking 101
Steam: There is no temperature adjustment when using the steam setting. You can adjust the time up to 30 minutes. When using this feature it is important to make sure the black valve on the top is set to vent and not to seal.
Slow Cook: This function works like a slow cooker would and can be set to Hi or Low. You can customize the time up to 12 hours. When using this feature, you will want the black valve on the top set to vent and not to seal.
Sous Vide: This function heats and holds the water at the temperature you set it and cooks the food in a water bath. The food is in a container and the container is placed in the water bath. The temperature ranges are 120-190℉. *This function will work without the pressure lid, but it is recommended to use the pressure lid with the valve turned to VENT for the best results.
The following feature is used without a lid on the Ninja Foodi
Sear/Sauté: This feature has multiple temperature settings; Hi, Med-Hi, Med, Med-Low, and low. You do not have the ability to set the time for this feature. It will stay on until you turn it off.
***UPDATE*** You can use the pressure lid with the saute function although I recommend using the sear/saute without a lid so you can keep an eye on your food easily.
The following features are used with the crisping lid on.
Air Crisp with TenderCrisp Technology: The Air Crisp function has temperature settings from 300º F to 400° F and you can customize the time up to 1 hour.
Bake Roast:The bake/roast feature has temperature settings from 250° F up to 400º F and you can customize the time up to 4 hours.
Broil:The Broil Function does not have a temperature adjustment, it is either on or off. You can adjust the time up to 30 minutes.
The following feature is only on certain models and is used with the crisping lid on.
Dehydration: The dehydration function allows you to adjust the temperature from 105° F to 195º F. You can adjust the time from 15 minutes up to 12 hours.
The OL501 , OL601 , & OL701 models only have one lid, so all the functions are used with the same lid and there is a slider that you move to change the lid functions.
What Comes with the Ninja Foodi?
Your Ninja Foodi will arrive in a large box; which is fairly heavy, so be careful lifting it. There is a second box and inside that box is the actual Ninja Foodi. Everything is packaged very well for shipping.
Ninja Foodi Cookbook: There is a cookbook with over 45 recipes to get you started. Also included in the back are charts that give you guidelines for cooking with different settings and timing for various foods.
I have heard from numerous people that the recipes in the book tend to be salty, so use your judgement with the seasoning recommendations. * The recipes in this cookbook use Kosher salt and that is very different from table salt. You can use either Kosher or sea salt OR reduce the amounts considerably if you are using table salt.
I have only tried the Macaroni and Cheese recipe and I have to say it was horrible. I even cut way back on the salt and it still was inedible. If you make it, leave out the baking soda as I think that was the culprit. They added baking soda to preserve the texture of the noodles, but it really gave the whole dish a weird taste and a strange color.
From the feedback I get, the Whole Chicken recipe is very good and people rave about the Chicken Pot Pie.
If you have tried any of them, please leave us comment with your thoughts on the recipe in the comment section at the bottom of this post. That way everyone can share and learn from each other.
Get to know your Foodi guide: This is a quick start guide that briefly explains what's in the box and why there are two lids, outlines the pressure test and functions and includes a cooking cheat sheet. There is also a recipe for a whole roasted chicken that looks terrific.
Owners Guide: This is a comprehensive guide to using your Foodi and includes an overview of the various functions of the Ninja Foodi, goes over care and maintenance of the Foodi, and includes a troubleshooting guide. I do recommend reading the owners guide when you first get started with the Ninja Foodi.
Pressure Cooker Lid: This is a separate lid that you will put on when using various functions on the Ninja Foodi. On the underside of this lid is a valve cap, this cap can and should be removed for cleaning after every use. The black valve on top of the Ninja Foodi can be removed according to the owners guide for cleaning and inspecting for clogs. When my Foodi was delivered, the black valve cap was off. I was able to pop it back on very easily and have not had any issues. The valve is supposed to be loose and float when on seal, this is a safety precaution so excess steam/pressure can be released during pressure cooking. When you turn the valve to vent, it raises up a bit and sits on a little ledge. You will fel it click into place.
If your black cap comes off, just pop it back on. There is also a red button on the top of the pressure lid. This button stays depressed until the Ninja Foodi comes up to pressure, and then it pops up. You cannot open the lid when the red button is up. This is a safety feature to prevent opening the pot while it is under pressure which could result in burns.
Air Crisp Lid: The air crisp lid stays attached to the Ninja Foodi and you put it down over the pot during certain cooking functions. It has a fan and a heating element. The fan circulates the hot air like a convection oven. You can open the lid at any time during the cooking process to check on your food.
Smart Lid: Newer models only have one lid and it is called the Smart Lid. This lid stays attached and used during all of the functions (not usually with sear/sauté). There is a slider that you move to change which functions you can use. This lid is available on model numbers OL501 & OL601.
Smart Lid with Temperature Probe & Programmable Pressure Release: This lid with its extra features are only available on Ninja Foodi model # OL701. The two big differences with this lid is you can monitor the temperature of your food with a built in probe and this works for pressure cooking! It's amazing. Even better than that is the ability to program your pressure release. I get into that in detail in the Ninja Foodi Complete Buying Guide and I include video showing how it works!
How to use the Ninja Foodi: Getting Started
What do all these abbreviations mean when cooking in the Ninja Foodi?
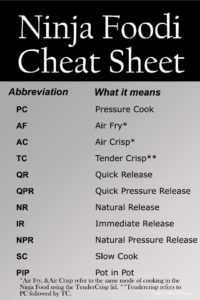
The pressure cooking world has its own language and the Ninja Foodi world is adding to it! It can get pretty confusing when reading Facebook posts like: "I made frozen chicken with BBQ Sauce and here is how I did it. PIP method, PC for 10, NR x 10, followed by IR, brush with BBQ, then AF @390° for 5."
Say what? At least that was my reaction when I first started pressure cooking. Turns out this new language is pretty easy to understand when you know what the abbreviations stand for. Here is a chart for you to refer to if needed.
Did I leave something out? Please let me know in the comments and I will be sure to add it.
A quick tip: If a recipe doesn't specify HIGH or LOW pressure cooking, assume they are referring to High.
Getting Started with the Ninja Foodi
Before first use:
After you have unpacked the Ninja Foodi, you will want to thoroughly wash the washable parts. I recommend using the dishwasher to wash the silicone ring (on the top rack), the basket, rack, and the inner pot. Never put the pressure cooker lid or the Ninja Foodi base in the dishwasher. I have read where a lot of people will wash their pressure cooker lid in the dishwasher, but I do not recommend it.
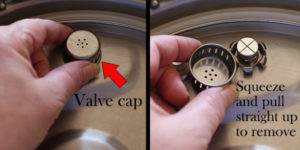
There is also a silver anti-clog cap on the inside of the pressure cooker lid that can (and should) be removed and cleaned before the first use and after every use. I recommend washing this by hand, a toothbrush works great. The anti-clog cap protects the inner pressure valve from getting clogged. If the inner valve is clogged, you may see food spattering out of the release valve when you release the pressure. I have never noticed any food or debris on my anti clog cap, but it is still a good idea to clean it.
There is also a condensation tray that needs to be put in place before first use. This does not affect the way the Ninja Foodi operates, but collects any condensation that may develop during pressure or steam cooking. Be sure to remove it and clean it after every use. It is easy to forget this step, but I have heard some stories about mold building up when the water isn't emptied out. You only need to worry about this when cooking with the pressure lid on. Condensation will not form when the tender crisp lid is in use.
Pressure Test:
When you first get your Ninja Foodi, you will want to familiarize yourself with it and make sure it is working as intended. The easiest way to do this is by conducting a Pressure Test. The pressure test is very simple.
You will add 3 cups of water to the inner pot, secure the pressure lid, turn the black valve to seal. Select the Pressure button, select high with the arrows to the left and select 3 minutes with the arrows to the right. Hit start. You will see a rotating square of lights letting you know that the Ninja Foodi is heating up. This can take 8-10 minutes. The Ninja Foodi has to heat the water to create the steam needed to come under pressure.
During this time, you may see steam escaping from the black valve and/or the red button on the top of the lid. This is normal. If you see steam coming out around the whole lid, this is not normal. Stop the Ninja Foodi.

Turn the black valve to vent and allow the steam to escape. Remove the lid and allow it to cool. The most common reason that this happens is the seal is not correctly placed. Make sure the silicone seal is seated in the grooves of the pressure cooker lid.
If that does not correct the problem and steam is still leaking out around the pressure lid, contact NinjaKitchen.
Here is a video on how to do the Pressure Test
How to use the Ninja Foodi and its various functions
Pressure Cooker Function:
Essentially, the pressure cooker is a pot with a sealing lid that has a valve (the black valve that turns from seal to vent) to release pressure and a vent/button (the red button)to regulate pressure. For the purpose of this article we will be referring to an electric pressure cooker like the Ninja Foodi.
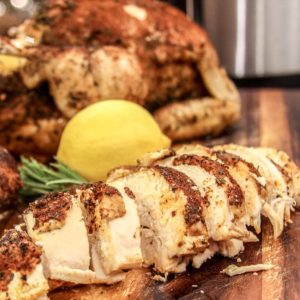
The pressure cooking feature is a great way to speed up the cooking process. Foods, as a general rule, are done in ⅓ of the the time it would take on the stove or in the oven. For example, a whole chicken takes around 20 minutes per pound in the oven to roast. Under pressure, it should take around 5 minutes per pound. In this recipe for Instant Pot Whole Chicken, I went with 4 minutes per pound, plus 2 extra minutes. It turned out perfectly, and I honestly don't think I needed the extra 2 minutes.
How do I choose the right time for Pressure Cooking?
There are many variables to consider when choosing the time for pressure cooking and here are a few to keep in mind.
Temperature: The temperature of the food will make a difference when deciding on a time to set for pressure cooking. The colder the food, the longer the cook time. Frozen foods will take longer than those at room temp. For example, frozen chicken breasts will take around 10 minutes of high pressure, while thawed chicken will only take around 5 minutes.
PIP or Pot in Pot cooking:This is where you are cooking food in its own pot or container inside the pressure cooker pot. Personally, I love this style of cooking when making several components of a meal at once. For example, white rice cooked right in the inner pot will take less time than if you put it in its own container. I don't mind the few extra minutes, because I have had much better results using PIP cooking with rice than putting it directly in the inner pot of the Ninja Foodi. I like to use these aluminum cake pans by Fat Daddio. They conduct heat very well, so the increase in time is not nearly as much as if you are using a pressure safe ceramic container. I will be delving into PIP cooking more in a future article and welcome any questions you may have.
Type of Food: By far, this is the most important consideration when choosing your pressure cooking time. Keep in mind the density and size of the food, denser and larger sizes of foods will take longer. For example, a whole potato can take 10-15 minutes of pressure cooking time verses small diced potatoes that take 1-2 minutes or a whole 3 lb beef roast will take longer than a 3 lb. beef roast cut into chunks.
How much liquid should I use when pressure cooking?
This is a wildly-debated topic and I am only sharing my opinion based on numerous trials and (thankfully few) errors when cooking under pressure. The quick answer is, it depends. I know, that's not what you want to hear.
Unfortunately, there is not an exact amount of liquid as long as your pot is able to come up to pressure. Certain types of liquids are not suitable for creating steam needed for pressure cooking and might cause a burn notice; such as, milk, cream-based soups, and tomato sauce. You can use these liquids, but you will also need to add a thinner liquid so your pot will come up to pressure. It is the thin liquid that produces the steam required to cook under pressure.

When deciding on the amount of liquid, keep in mind what you want your end result to be. For example, when making white rice I always use a 1:1 ratio of liquid to rice, if that is the only thing in the pot. When I made this yummy Jambalya Soup, I used 64 ounces of liquid (plus some from other sources). I don't want any extra liquid when making rice, but I want my soup to be soup.
Also keep in mind what liquid will be released or absorbed from the food you are cooking. For example, a beef chuck roast will produce quite a bit of liquid on it's own during the pressure cooking process. So, for a flavorful gravy, I might only add 1-2 cups of liquid with the understanding that I will end up with around 3-4 cups. Could I add 3 or 4 cups to begin with? Sure, but I would end up with a diluted tasting liquid not suitable for gravy.
Pressure cooking imparts a lot of flavor in a short amount of time, so you can achieve that cooked-all-day taste in a fraction of the time.
Quick Tip: Use broths instead of water to really enhance the flavor of your dishes. I did this with my spaghetti recipe and it tasted like I cooked the sauce all day!
I highly recommend reading this article: Pressure Cooking 101 where I go into much more detail and even review the thought process that goes into converting your recipes to the Ninja Foodi pressure cooker.
Steam Function:
I love all the functions of the Ninja Foodi and find uses for all of them, but the steam function is my go-to when reheating leftovers that aren't air fried. I simply put what I want to re-heat into aluminum cake pans cover with foil and put on the rack (high or low position) with 2 cups of water in the bottom. I set the steam function for 5-10 minutes depending on the density of the food I'm reheating and Voila! Perfectly heated food that retains its moisture without over cooking.
The steam function is different than the pressure cooking function as it allows steam to escape while cooking foods. This is a great option for veggies, delicate fish, and rice. You can also remove the lid during the steaming process to check on foods, but be careful and open it away from you because there is a lot of steam built up and it's hot.
I recently made a slow cooker (in the Ninja Foodi) pork curry and decided to re-heat it at the same time I was making fresh rice. I used this bamboo steamer with the 6" Fat Daddio cake pans and it worked perfectly.
The steam function is also great when you want to quick cook foods and also want to reduce the liquid some, like I did in this video for Sloppy Joes in the Ninja Foodi.
I will go into more detail regarding the uses of the steam function in a future article and I welcome you to comment on this post with your questions and I will try to answer them.
Slow Cook Function:
As if there weren't enough uses for the Ninja Foodi, it even has a slow cook function. You can set the temp to high or low and remember to turn the black valve to vent when slow cooking. We want to release the built-up steam. While most of us like the speed of pressure cooking, the slow cook function sure has its uses.
The other day I was trying to decide what to make for dinner and realized that all of my meats were frozen. Sure, I could have pressure cooked frozen meat, but it was early in the day and I decided to try out a pork tenderloin in the slow cooker. I dumped in the ingredients, set it on high and my curry pork and veggies ( I added them in the last hour) were done in time for dinner. It was a hands-off kind of dinner and very yummy.
I have heard some people say that the slow cook function on the Ninja Foodi does not live up to expectations based on stand-alone slow cookers. What I found is that it takes a lot longer for the Ninja Foodi to heat up using the slow cook function, but it certainly did the job. I have only tried it on high so far and it really cooked the pork tenderloin perfectly.
I'll update this post as I find more uses for the Slow Cook Function on the Ninja Foodi.
Sear/Saute Function:
I love this feature of the Ninja Foodi and use it all the time. Now, you will not get that great sear on meats like you do in a stainless steel pot, but I find the sear is sufficient for what I am using it for. I have heard that NinjaKitchen is going to offer a stainless steel pot soon and that's super exciting!
You can use this setting on several different temperatures, although I tend to use the high setting the most. It is great for sauteing vegetables before adding in broth and other ingredients to make soups or stews. Heating the milk to make Homemade Yogurt in the Ninja Foodi. I even used it to make the base for ice cream the other night.
Air Crisp Function:
Absolutely one of the biggest selling points of the Ninja Foodi is the Air Crisp Function! It works great. I have not had an air fryer before the Ninja Foodi, so I cannot compare a stand-alone air fryer to the Foodi, but I love this feature. One of the best things about the Ninja Foodi is that you can pressure cook and then use the air crisp function to brown the meat or crisp the top.
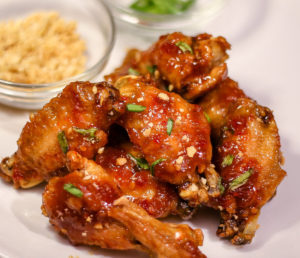
To be completely honest, I had my doubts about air frying. That's why I never bought one, but I am sure glad to have one now. My first test using the air crisp mode on the Ninja Foodi was making these Asian Sticky Wings. Oh, man! They were so crispy and delicious, I was completely sold on the Ninja Foodi from that point on.
Should I use the Basket or Rack when air frying?
A question I get a lot is when to use the basket verses the rack. I will go into much more depth on this in a future article, but I do want to touch on the subject real quick.
The basket that comes with the foodi is meant to be used with the air fryer, bake or steam function. Always use it with the diverter (those removable legs) so that air can circulate under the basket and help cook and brown the bottom of the food.
I absolutely recommend using the basket for air frying over the rack, however the rack can be used if the food you want to air crisp won't fit comfortably in the basket. For example, I recommend using the rack over the basket for whole chickens because it allows them to cook more evenly, especially when they are on the larger size.
Quick tip: If you have a food that you want to AC in the basket, but are worried it will stick. Cut a round shape of parchment the size of the basket and poke several holes in it to allow air flow. Then place the round in the bottom of the basket and place food on top. It makes clean up a breeze too.
Please note, your Ninja Foodi may have come with a crisping plate instead of a basket and although it does work, I much prefer the crisping basket. You can purchase them from Ninja Kitchen as an accessory.
Bake/Roast Function:
The bake/roast function on the Ninja Foodi works just like a small convection oven. I did several tests with this function because people were saying that they were burning their food when using the bake/roast function. What I found is that the temperatures are accurate. When you set it to 350° F, it heats up to 350° F. So why does it cook food faster? Because of the fan that circulates the hot air.
When cooking in a convection oven, food gets done quicker. Sometimes this is great and sometimes, like with breads and denser foods, it can leave you with food that is too brown on the outside and not cooked in the middle. To adjust for this, I suggest decreasing the temperature by 50° F. For example: if your cornbread recipe states to bake at 425° F, set the bake/roast function to 375° F and cook for the stated time. Remember, you can always lift the lid to check the progress. Just don't do it too much, because you let out the heat each time you open the lid.
Broil (Grill) Function:
I've had a few people ask me if there is a difference between the bake/roast function and the broil function. There is! It gets hotter than the bake/roast function by 25° F. While you cannot set a temperature for the broil function, it will get up to around 425º F after 15 minutes.
I will definitely be diving deeper into the uses for this function in the near future. I haven't had enough time to do the testing on this yet.
Dehydration Function:

I have fallen in love with this function for sure! The funniest thing is, I haven't even used it yet for dehydrating. The dehydration function allows you to set the Ninja Foodi for super low temperatures that are great for proofing bread in half the time it takes on the counter.
I will be releasing a video on how to make bread in the Ninja Foodi soon, so be sure to subscribe to our YouTube Channel and click the notification bell so you are notified when we release a new video.
The other great news is you can make homemade yogurt using the dehydration function and it turns out wonderful!
If you have not purchased a Ninja Foodi yet, I highly recommend getting one with the dehydration function. I have a feeling there are going to be many more uses for this function than just dehydrating.
How can I convert Instant Pot recipes for the Ninja Foodi?
This is a question I see asked a lot, so I wanted to take a few minutes to address it. There aren't that many Ninja Foodi specific recipes out there because the appliance is so new. It takes time to develop, test, and write a recipe that can be duplicated by any level of cook. I know I'm working non-stop on new recipes and I'd bet other food bloggers are, too.
Pretty soon, the Ninja Foodi will have tons of recipes to follow... until then, you can convert other recipes to the Ninja Foodi. If you ever need help, send me an email or post in one of our Ninja Foodi groups and I'm happy to help if I can. Our two Facebook groups are: Ninja Foodi 101 and Ninja Foodi Fresh & Healthy Meals.
Most Instant Pot recipes are written using the HIGH or LOW pressure settings and can be easily converted to the Ninja Foodi's pressure cooking function by following the same instructions. If a recipe does not state High or Low setting for pressure cooking, assume it is high.
While there is a difference in wattage between various models of pressure cookers and the Ninja Foodi, the wattage is only going to affect the time it takes to come up to pressure. Once any pressure cooker comes up to pressure it will reach a certain pressure per square inch and maintain the same temperature inside the pot.
Keep in mind though, that it has been said all around the pressure cooking world that each pot seems to cook a bit differently. There are many variables; altitude, temperature of ingredients, size of food, etc., that can affect pressure cooking.
Each person has certain likes and dislikes, as well. So, for one person, pasta cooked for 10 minutes is perfect and for another it would be mushy. If you know you like your veggies crisp or your pasta al dente, always decrease the cook time by a few minutes. You can always add time, but you can't un-cook food.
Now let's talk about those Instant Pot presets
I'll bet you have read a recipe or two that says push the meat button to cook. Hello... I don't have a meat button!
You don't need one, trust me. Truth is, I have an Instant Pot with all the bells and whistles and those presets. I never use them unless I'm making yogurt.
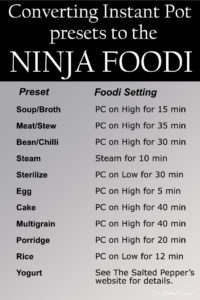
Just in case you want to use the presets as a guideline for your Ninja Foodi recipes, here is a chart of temp & cooking times. ➡️➡️➡️➡️➡️➡️➡️➡️➡️➡️➡️➡️
All those buttons are, are preset times and temps and they aren't that accurate either. For example, the meat/stew button on the Instant Pot 8 quart Ultra sets the pressure cooker to cook on high for 35 minutes. Try cooking a chicken breast for 35 minutes on high pressure, I'll bet you won't be happy with the results.
Be sure to subscribe to The Salted Pepper for email updates and if you want more in depth information on using your Ninja Foodi to its fullest potential, check out our online course!
Are you ready to get cooking? Here are some easy and delicious recipes to get started with!
-
Ninja Foodi Spaghetti Recipe
-
One-Pot Sausage Peppers & Pasta ~ Pressure Cooker Recipe
-
Ninja Foodi Whole Chicken ~ 4 Cooking Techniques
-
Pressure Cooked Beef Stew in the Ninja Foodi
-
Perfect Roast Beef in the Ninja Foodi
-
Bacon Mac and Cheese in the Ninja Foodi
-
Lemon Garlic Pasta with Vegetables ~ Ninja Foodi or Pressure Cooker Recipe
-
Homemade Garlic & Herb Rice-A-Roni
ABOUT THE RECIPE AUTHOR, LOUISE LONG
Louise is a full-time recipe creator and food blogger @ The Salted Pepper. She has over 30 years of experience with cooking and recipe development. She owned a restaurant for several years and was a full-time RN until retiring to blog full-time.

Louise has several very active Facebook groups that help people with the basics of cooking and getting the most out of the Ninja Foodi.
Ninja Foodi 101
Ninja Foodi Fresh & Healthy Meals
Simply Cooking with Louise
Seeing the need for easy, delicious, and high quality recipes, she is focusing all of her efforts creating recipes specifically for the Ninja Foodi. Her recipes are easy for the home cook to follow and provide step-by-step instructions.
Louise is also a YouTube creator and you can find most of her recipes in video format on The Salted Pepper YouTube channel.
She is very responsive to messages and eager to help in any way she can.
I WOULD LOVE TO SEE WHAT YOU ARE COOKING UP IN YOUR NINJA FOODI! TAG ME @THESALTEDPEPPER ON YOUR FAVORITE SOCIAL MEDIA PLATFORM WHEN YOU MAKE A DISH!
BE SURE TO FOLLOW THE SALTED PEPPER RIGHT HERE ⇓⇓⇓⇓⇓
Ninja Foodi Cooking Times Chart
Source: https://thesaltedpepper.com/how-to-use-the-ninja-foodi/
Posted by: ricedinvis.blogspot.com
0 Response to "Ninja Foodi Cooking Times Chart"
Post a Comment